Appearance
常见问题
MyBatis-Flex 没有启动或者启动出错怎么办?
正常情况下,MyBatis-Flex 在启动时,会在控制台打印如下 Banner 信息,包含版本与官方网址,如果在项目启动中没有发现 MyBatis-Flex 的 Banner 打印,那就说明 MyBatis-Flex 没有被正常加载。
txt
  __  __       _           _   _       _____ _
 |  \/  |_   _| |__   __ _| |_(_)___  |  ___| | _____  __
 | |\/| | | | | '_ \ / _` | __| / __| | |_  | |/ _ \ \/ /
 | |  | | |_| | |_) | (_| | |_| \__ \ |  _| | |  __/>  <
 |_|  |_|\__, |_.__/ \__,_|\__|_|___/ |_|   |_|\___/_/\_\
         |___/ v1.5.4 https://mybatis-flex.com
需要做如下排查:
- 1、是否添加了数据源(Druid、HikariCP 等)依赖,或者添加了错误的数据源依赖版本。比如 SpringBoot v2.x 使用 HikariCP 时,应该是 HikariCP 的 4.x 版本。而 SpringBoot v3.x 应该使用 HikariCP 的 5.x 版本。
- 2、是否主动添加了
mybatis-spring-boot-starter的依赖,导致版本不匹配。使用 SpringBoot 的情况下,应该引用mybatis-flex-spring-boot-starter就可以了,不需要再添加其他 MyBatis 依赖。 - 3、是否与
mybatis-plus-boot-starter共用,使 MyBatis 被优先初始化,而导致 MyBatis-Flex 没有被加载。 - 4、是否添加了
pagehelper-spring-boot-starter依赖,导致传递了mybatis-spring-boot-starter依赖。如还想继续使用 pagehelper 插件,点击 这里 查看解决方案。 - 5、是否 Spring Boot 版本过低,请使用 Spring Boot 2.2 及其以上版本,点击 这里 获取详细信息。
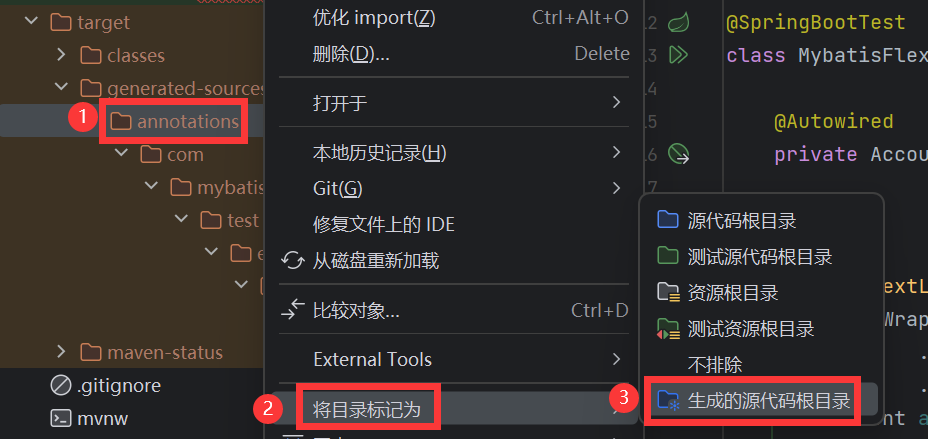
示例中的 AccountMapper 和 "ACCOUNT" 在哪里,报错了。
MyBatis-Flex 使用了 APT 技术,这两个类是自动生成的,需要编译一下项目。如果已经生成但是导入不了,按如下方法将 target/generated-sources/annotations 目录标记一下即可。

参考:MyBatis-Flex APT 配置 - MyBatis-Flex 官方网站
与 spring-data 整合输出 trationDelegate$BeanPostProcessorChecker 警告
text
Bean 'x' of type [x] is not eligible for getting processed by all BeanPostProcessors (for example: not eligible for auto-proxying). Is this bean getting eagerly injected into a currently created BeanPostProcessor [projectingArgumentResolverBeanPostProcessor]? Check the corresponding BeanPostProcessor declaration and its dependencies.排除 SpringDataWebAutoConfiguration 自动配置类即可:
java
@SpringBootApplication(exclude = SpringDataWebAutoConfiguration.class)
public class SampleApplication {}
如果还是有警告,直接将日志级别改成 ERROR:
yaml
logging:
  level:
    org.springframework.context.support.PostProcessorRegistrationDelegate: error
阿里镜像找不到依赖?
txt
Could not find artifact com.mybatis-flex:mybatis-flex-spring-boot-starter:pom:1.x.x
in alimaven (http://maven.aliyun.com/nexus/content/groups/public/)这个是因为目前阿里云镜像正在维护,可以替换为腾讯云或者华为云的镜像源,更改 Maven 安装目录下的 settings.xml 文件, 添加如下配置:
腾讯云:
xml
<mirror>
    <id>tencent-cloud</id>
    <mirrorOf>*</mirrorOf>
    <name>tencent-cloud</name>
    <url>https://mirrors.cloud.tencent.com/nexus/repository/maven-public/</url>
</mirror>
华为云:
xml
<mirror>
    <id>huawei-cloud</id>
    <mirrorOf>*</mirrorOf>
    <name>huawei-cloud</name>
    <url>https://mirrors.huaweicloud.com/repository/maven/</url>
</mirror>
SpringBoot 3.2 项目,启动报错 Invalid value type for attribute 'factoryBeanObjectType': java.lang.String
这个是 mybatis-spring 依赖版本过低造成的,需要使用 springboot 3 对应的 starter 依赖。
xml
<dependency>
    <groupId>com.mybatis-flex</groupId>
    <artifactId>mybatis-flex-spring-boot3-starter</artifactId>
    <version>${mybatis-flex.version}</version>
</dependency>
SpringBoot 项目,启动报错 java.lang.ClassNotFoundException: org.springframework.transaction.TransactionManager
这个应该是 Spring Boot 版本的问题,org.springframework.transaction.TransactionManager 这个类是 Spring Framework 5.2 新增的,对应 Spring Boot 的版本应该是 Spring Boot 2.2 及其以上版本,所以应该使用 Spring Boot 2.2 及其以上版本。
SpringBoot 项目,启动报错 Property 'sqlSessionFactory' or 'sqlSessionTemplate' are required
如果当前依赖没有连接池相关依赖,则建议添加 HikariCP 依赖。
SpringBoot v2.x 添加 hikariCP 的内容如下:
xml
<dependency>
    <groupId>com.zaxxer</groupId>
    <artifactId>HikariCP</artifactId>
    <version>4.0.3</version>
</dependency>
SpringBoot v3.x 添加 hikariCP 的内容如下:
xml
<dependency>
    <groupId>com.zaxxer</groupId>
    <artifactId>HikariCP</artifactId>
    <version>5.0.1</version>
</dependency>
如果使用的是 druid 数据库连接池,则需要添加数据源类型的配置
spring.datasource.type=com.alibaba.druid.pool.DruidDataSource。
SpringBoot 项目中出现 class "com.xxx" cannot be cast class "com.xxx" 的错误
这个问题是由于 Spring 的 devtools 热加载引起的,可以在项目的 resources/META-INF 目录下创建一个名为 spring-devtools.properties 的配置文件,配置内容如下:
properties
restart.include.mapper=/mapper-[\\w-\\.].jar
restart.include.pagehelper=/pagehelper-[\\w-\\.].jar
restart.include.mybatis-flex=/mybatis-flex-[\\w-\\.]+jar
相关文档参考 Spring 的官方网站:https://docs.spring.io/spring-boot/docs/current/reference/htmlsingle/#using.devtools.restart.customizing-the-classload
SpringBoot 项目中出现 java.lang.IllegalArgumentException: object is not an instance of declaring class 的错误
这个问题也是由于 Spring 的 devtools 热加载引起的,解决办法参考 上述问题。
java.sql.SQLException: No value specified for parameter x
出现这个问题,原因是 MyBatis-Flex 未能正常启动,SQL 执行没有经过 MyBatis-Flex 导致的。其直接是因为和其他第三方增强框架整合使用了, 比如和 MyBatis-Plus、或者 PageHelper 等整合造成的。
如何与 PageHelper 整合可以点击 这里 查看
整合 Springboot 3 出现 ClassNotFoundException: NestedIOException 的错误
需要使用 springboot 3 对应的 starter 依赖。
xml
<dependency>
    <groupId>com.mybatis-flex</groupId>
    <artifactId>mybatis-flex-spring-boot3-starter</artifactId>
    <version>${mybatis-flex.version}</version>
</dependency>
Spring 下使用 Druid 数据源无法启动
原因是在数据源的配置中,未添加 type 字段的配置:
yaml
spring:
  datasource:
    type: com.alibaba.druid.pool.DruidDataSource
    url: jdbc:mysql://127.0.0.1:3306/dbtest
    username: root
password: 123456第 3 行中的 type 字段不能为空,这个并非是 MyBaits-Flex 的问题,而是 Spring 没有内置对 Druid 数据源类型 的主动发现机制。若使用 hikariCP 数据源,则可以不配置 type 内容。
若把数据源配置到
mybatis-flex.datasource下,使用 mybatis-flex 的数据源发现机制, 使用 druid 则可以不用配置 type,更多文档参考:多数据源章节。
与 PageHelper 集成出现错误
在社区中,一些老的项目在使用到了开源项目 PageHelper,用于解决 xml 的分页问题,在和 MyBatis-flex 整合使用中,出现了一些错误,原因是 pagehelper-spring-boot-starter 依赖了 mybatis-spring-boot-starter, 此时需要把 pagehelper-spring-boot-starter 依赖替换为 pagehelper,然后手动添加 PageInterceptor。
xml
<dependency>
    <groupId>com.github.pagehelper</groupId>
    <artifactId>pagehelper-spring-boot-starter</artifactId>
    <version>版本号</version>
</dependency>
需要把以上依赖替换如下:
xml
<dependency>
    <groupId>com.github.pagehelper</groupId>
    <artifactId>pagehelper</artifactId>
    <version>5.3.3</version>
</dependency>解决方案:https://gitee.com/mybatis-flex/mybatis-flex/issues/I71AUE
代码生成器获取不到注释
如果是 MySQL 数据库的话,可能是因为数据库版本太低,解决办法:在 jdbcUrl 设置参数 useInformationSchema=true 才能获取到注释。
例如:jdbc:mysql://127.0.0.1:3306/mybatis-flex?characterEncoding=UTF-8&useInformationSchema=true
如果是 Oracle, 则需要添加参数 remarksReporting=true ,例如:jdbc:oracle:thin:@localhost:1521:orcl?remarksReporting=true
与 Nacos 集成时出错,无法正常启动 MyBatis-Flex
一般情况下,是因为缺少 Nacos 的相关 Maven,注意添加如下的 Nacos 依赖:
xml
<dependency>
    <groupId>com.alibaba.cloud</groupId>
    <artifactId>spring-cloud-starter-alibaba-nacos-config</artifactId>
    <version>2022.0.0.0</version>
</dependency>
如何自定义 MyBatis 的 Configuration?
1、在不使用 Spring 的场景下:
java
FlexConfiguration configuration = new FlexConfiguration();
MybatisFlexBootstrap.getInstance().setConfiguration(configuration);
2、在使用 SpringBoot 的场景下:
java
@Configuration
public class MyConfigurationCustomizer implements ConfigurationCustomizer {

    @Override
    public void customize(FlexConfiguration configuration) {
        // 在这里为 configuration 进行配置
        configuration.setLogImpl(StdOutImpl.class);
    }
}
3、只使用 Spring(不使用 SpringBoot ) 的场景:
java
@Bean
public SqlSessionFactory sqlSessionFactory(DataSource dataSource) throws Exception {
    SqlSessionFactoryBean factoryBean = new FlexSqlSessionFactoryBean();
    factoryBean.setDataSource(dataSource);

    // 在这里配置
    FlexConfiguration configuration = new FlexConfiguration();
    configuration.setLogImpl(StdOutImpl.class);

    factoryBean.setConfiguration(configuration);
    return factoryBean.getObject();
}
如何在插入数据成功时,获得到主键内容?
在 MyBatis-Flex 中,一个主键没有赋值的 Entity(主键内容为空),通过 BaseMapper 插入成功后,其主键会自动被赋值,例如:
java
//创建一个没有 id 内容的 account
Account account = new Account();
account.setUserName("michael");

//插入数据
accountMapper.insert(account);

//插入成功后,其 id 自动被赋值
System.out.println("插入成功的 Account 的 id: " + account.getId());
如果使用 Db + Row,代码如下:
java
//创建一个 row,并设置其主键类型为自增,主键字段名称为 id
Row row = Row.ofKey(RowKey.AUTO);
row.set("user_name", "michael");

//插入数据
Db.insert("tb_account", row);

//插入成功后,其 id 自动被赋值
System.out.println("插入成功的主键: " + row.get("id"));
RowKey 的说明:
RowKey 内部定义了 4 个常量,分别为
AUTO:字段名称为 id,类型为自增。UUID:字段名称为 id,类型为 uuid。FLEX_ID:字段名称为 id,类型为 flexId。SNOW_FLAKE_ID,:字段名称为 id,类型为雪花算法。
如果表的主键名称不是 id,或者主键的生成类型并非以上的 4 种类型,则需要我们自定义 RowKey,可以通过 RowKey.of() 方法来自定自己的主键名称和类型。 例如:
java
//创建一个 rowKey,字段名称为 my_id,生成类型为雪花算法。
//整个应用全局定义一个静态变量,然后所有 row 复用就可以
RowKey rowKey = RowKey.of("my_id"
    , KeyType.Generator
    , KeyGenerators.snowFlakeId);

Row row = Row.ofKey(rowKey);
row.set("user_name", "michael");

//插入数据
Db.insert("tb_account", row);

//插入成功后,其 my_id 自动被赋值
System.out.println("插入成功的主键: " + row.get("my_id"));
如何替换 Ruoyi 项目中的 MyBatis 为 MyBatis-Flex ?
参考 issue:https://gitee.com/mybatis-flex/mybatis-flex/issues/I7UX96
MyBatis-Flex 如何 activiti6 以及 Flowable 等工作流引擎集成?
当 MyBatis-Flex 与 activiti6 (或者 Flowable)集成时,需要覆盖其自动配置;添加 mybatis-flex 的事务管理器(FlexTransactionManager)和 DataSource(FlexDataSource) 注入到 ProcessEngineConfiguration,配置代码如下:
java
@Bean
public ProcessEngineConfiguration processEngineConfiguration(
        SqlSessionFactory sqlSessionFactory,
        PlatformTransactionManager annotationDrivenTransactionManager) {

    SpringProcessEngineConfiguration processEngineConfiguration = new SpringProcessEngineConfiguration();

    // 指定 MyBatis-Flex  数据源
    processEngineConfiguration.setDataSource(sqlSessionFactory.getConfiguration().getEnvironment().getDataSource());

    // 配置 MyBatis-Flex  的事务管理器
    processEngineConfiguration.setTransactionManager(annotationDrivenTransactionManager);
    ...
}
MyBatis-Flex 与camunda工作流引擎集成事务兼容问题?
当Mybatis-Flex 与camunda集成时,存在事务不兼容问题;需要覆盖其自动配置;添加 mybatis-flex 的事务管理器(FlexTransactionManager)和 DataSource(FlexDataSource) 注入到 ProcessEngineConfiguration,配置代码如下:
java
 @Bean(name = "processEngineConfiguration")
    public ProcessEngineConfigurationImpl processEngineConfiguration(SqlSessionFactory sqlSessionFactory,
                                                                     PlatformTransactionManager annotationDrivenTransactionManager) throws NoSuchFieldException, IllegalAccessException {
        final SpringProcessEngineConfiguration processEngineConfiguration = CamundaSpringBootUtil.springProcessEngineConfiguration();
        DataSource dataSource = sqlSessionFactory.getConfiguration().getEnvironment().getDataSource();
        //获取私有字段
        Field field = ProcessEngineConfiguration.class .getDeclaredField("dataSource");
        field.setAccessible(true);
        field.set(processEngineConfiguration, dataSource);
        processEngineConfiguration.setTransactionManager(annotationDrivenTransactionManager);
        processEngineConfiguration.setDatabaseSchemaUpdate(ProcessEngineConfiguration.DB_SCHEMA_UPDATE_FALSE);
        processEngineConfiguration.setTransactionFactory(new FlexTransactionFactory());
        processEngineConfiguration.setHistoryLevel(HistoryLevel.HISTORY_LEVEL_FULL);
        return processEngineConfiguration;
    }
